How we Refinished Our Grandma’s Old Dough Board
Our earliest memories of our grandma are of her in her kitchen. Whether she was at the sink washing green beans freshly picked from the garden, at the stove stirring a big pot of sauce, or sitting on her stool at her kitchen table mixing dough for biscotti – she was most at home in the kitchen. Each week she would make a feast for Sunday dinner (which was actually lunchtime). After spending a morning cooking nonstop, she would plop herself down at the head of the table, announce that she wasn’t hungry, and would watch everyone else, smiling. She cherished every moment spent watching her kids and grandchildren enjoying her food. Although it was never about the food. The food is what brought everyone together, and that’s what she loved. It was the casual conversation, the playful teasing, friends coming and going. She loved seeing everyone happy and content. It was what made her happy and content.
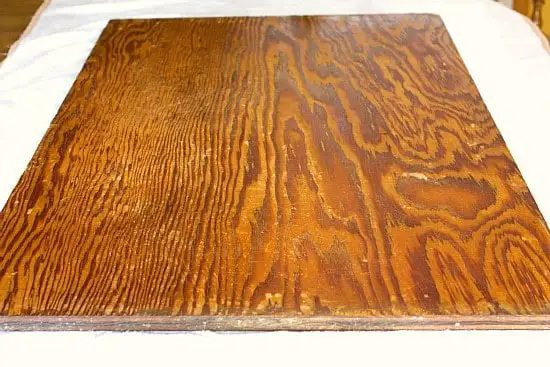
At the heart of our grandma’s kitchen was her large wooden dough board, which some could have easily mistaken for the top of her kitchen table, since it rested there so frequently. Our grandfather made it for her right after they got married over 70 years ago, and she used it her entire life. She used it to knead dough, roll out ravioli, cut gnocchi, shape biscotti, and for just about any other kitchen task you can imagine. A couple of years ago when she was no longer able to do much cooking she gifted the dough board to us, knowing that we would cherish it and get much use out of it. We had used it a few times, but while kneading a batch of blueberry bagel dough, we noticed that there were little pieces of wood coming off of the board and into the dough. Unfortunately, we had to throw the entire batch out. We figured we would have to refinish the board, but it ended up getting put on the back burner. Last October, when our grandma passed away, the board took on much more significance and restoring it became a priority. We did some research on what needed to be done, gathered our supplies, and a few weeks ago our mom and we spent a Saturday together making the dough board look brand new. We took photos and documented the process so that we could share it with you, as the process can be used on any old dough boards or wooden butcher blocks you may have that are in need of some TLC.
The Supplies
The list of supplies you will need is relatively small:
- Food-grade mineral oil (sometimes also referred to as “mystery oil”)
- Beeswax cream
- Sandpaper, varying grades of coarseness (we used 80, 120, and 320 – we also bought 220 but it wasn’t needed)
The mineral oil helps to keep the wood from drying out. When wood dries out it can shrink and crack, which can cause splintering and the potential for bacteria to seep in. The beeswax coating not only provides a smooth finish, but it also fills in gaps and pores and repels water, keeping the wood safe from rotting and mold.
We have seen mineral oil and beeswax cream at kitchen supply stores such as Sur la Table and Williams Sonoma, however we found ordering them on Amazon.com to be less expensive. We purchased Boos Block Mystery Oil and Boos Block Board Cream with Beeswax.
Getting Ready
Make sure you have a nice big area on which to work. Arrange some old towels underneath the board or butcher block you plan to refinish, with a good bit of space around all of the sides to catch the sandpaper shavings.
Cut your sandpaper into squares to make them easier to work with.
If your board is dirty or has some caked-on food residue, you may want to take a bench scraper and scrape off any pieces that can easily come off. Once you are done, wipe down the board with a dry rag.
Step 1: Sand, Sand, Sand
Get your elbow grease ready! Start with the coarsest sandpaper that you have. In our case, that was an 80 grit paper (the higher the number, the finer the grit). Working along the grain with long, even strokes, sand down the board to smooth out any splinters, rub out any residue, and smooth over any holes or divots.
Look at our mom go! We learned one thing during this process – we are awful at sanding, and our mom has the black belt equivalent in it. She is definitely a master! She attributes it to the fact that her and our dad sanded and stained every last piece of woodwork (trim, doors, etc.) when they built our house. We can’t even fathom how much patience that took!
We were amazed at how smooth the surface of the board became after just the first pass at sanding!
When you have finished doing the first pass with the coarse sand paper, use a damp towel to wipe down the wood and let it dry completely before moving on (it took about 20 minutes for the board to dry for us, sitting on the kitchen table, with a light on above it).
Once the board is dry, repeat the sanding with the medium-grit sandpaper (in our case, the 120) to continue smoothing the board. It’s getting there!
When finished, again wipe the board clean and allow to dry. Repeat the process with the finest grit sandpaper to put the final smoothing touch on the board. Wipe the board completely clean and allow to dry.
Look at how nice at smooth the surface of the board ends up being – all of the bubbles, cracks, divots, and valleys have been smoothed out. We loved sliding our hand across it!
Step 2: Apply the Oil
Once the board has dried completely, treat it with the mineral oil. Use a clean rag or a sponge to apply a liberal coat of the oil to the wooden board. Depending on how dry the board is, it may soak it up immediately. Continue applying oil until the board won’t absorb anymore. At that point, let the board sit for about 10 minutes, then gently wipe up any excess oil that has not been absorbed.
In our research, some places said to apply the beeswax cream immediately, while others said you could let the board sit overnight to soak up more oil. We waited about an hour and then proceeded.
Step 3: Apply the Cream
Using your fingers and moving in small circles, massage the beeswax oil into the board, working on a small section at a time. Once you have covered the entire board, let it sit for at least an hour or up to overnight. Using a clean cloth, wipe off any excess cream.
You’re done! The board is now ready to be used. Look at how lighter that wood looks, and what an awesome, sealed surface we’ve created:
Step 4: Maintenance
If you are using your board often, it is recommended that you reapply the mineral oil and the beeswax coating about once a month. It will keep the wood in lighter shape and protected from bacteria that could seep in.
Before & After
The official before and after photos of the dough board:
Our mom and we couldn’t believe the transformation after we had finished – you’d never know that the board had been hand-crafted over 70 years ago! We're so happy to now be able to use our grandma’s dough board; we know she’s with us each time we step foot in the kitchen. She was our biggest fan, and even as her appetite began to wane and she would announce she wasn’t hungry, she would never, ever turn down something that she knew we made. We know she’s thrilled that we're able to use her cherished dough board on an almost-daily basis, just as she did.
(Our grandma hated having her picture taken, so we're still digging around for one of her sitting at her dough board, but this is one of us from Christmas 2005.)